Russia’s War against Ukraine has lead to increasing electricity prices in EU. As a consequence, Hetzner had to increase their prices for dedicated servers significantly, also affecting my DragonFly server and my monthly bill. This, and the energy saving aspect of virtual servers over dedicated servers, made me decide to move all my mail and web services from the dedicated server over to a cloud server (VPS). This article goes through the challenges and pitfalls of running DragonFly on a Hetzner Cloud server.
Choosing the right server type
Choose a server from the Intel-line (CX11, CX21, CX31, CX41 or CX51). The AMD servers (CPX-xx) won’t work on DragonFly as they are using a newer version of VirtIO that is not (yet) implemented on DragonFly - while you can boot you will not have any network interface.
My choice is the CX21 with the following specs:
- 2 virtual CPUs
- 4 GB RAM
- 40 GB SSD
- 20 TB traffic
- 6.37 EUR / month (as of September 2022)
In contrast, my current dedicated server has the following specs:
- Intel Core i7-2600 (3.4 GHz / 4 cores / 8 threads)
- 16 GB RAM
- 4 TB HDD (2x SATA 2.0 TB Enterprise)
- unlimited traffic (?)
- TDP 95W
- ~38 EUR / month
And these are the usage statistics of my dedicated server:
- CPU: According to
uptimeit has a load of 0.0 - Disk:
dfshows that I am really just using about 28.6 GB of HDD space (most likely I am not even using the second HDD). - Network: The traffic statistic for the first half of 2022 shows 23 GiB incoming, 26 GiB outgoing with a total of 49 GiB.
So the CX21 should work well as I am not using tons of RAM. In case I need
more disk space, I will add another disk volume for 0.52 EUR per 10 GB per
month. Keep in mind that if you really need lots of disk space, you are most
likely better off using a dedicated server.
Booting DragonFly Live CD
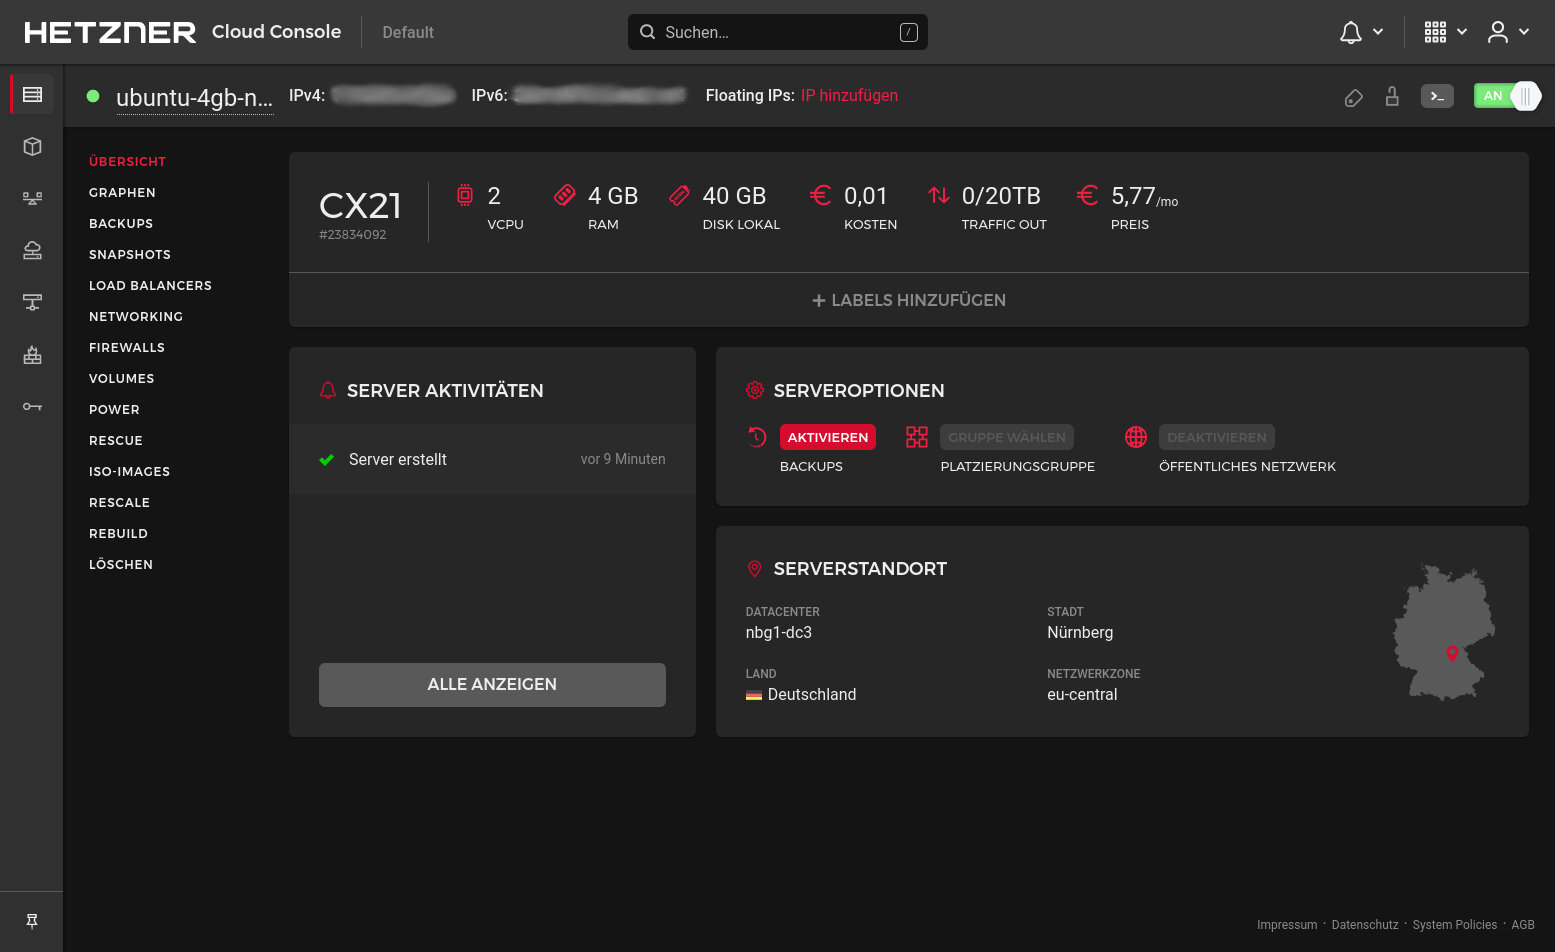
After ordering the virtual server, it usually comes up within a few seconds. By default, it has Ubuntu installed. The Cloud Console should look like this:
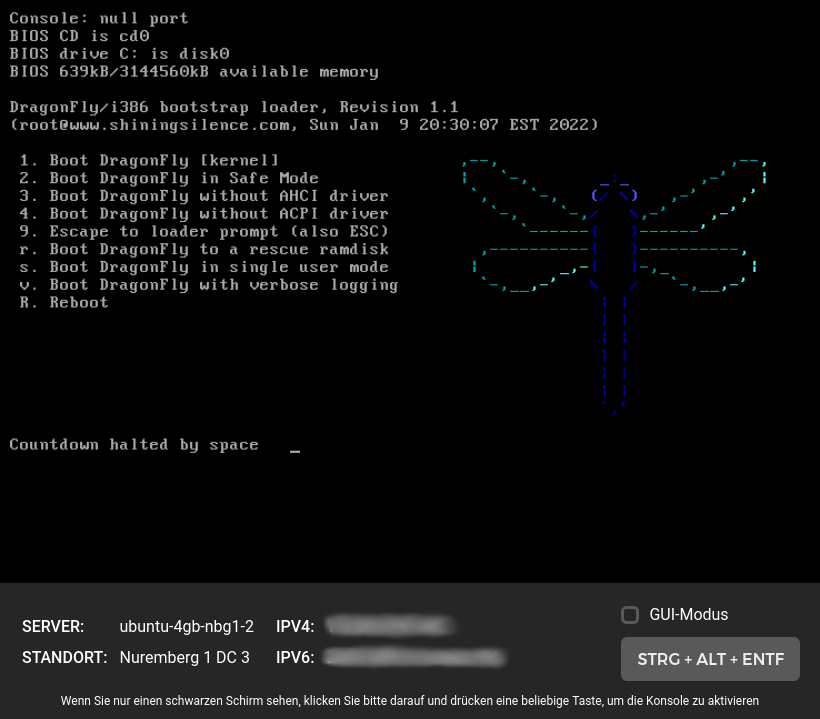
To install DragonFly on this server, you first need to make a DragonFly ISO image available under the “ISO-IMAGES” tab in the Cloud Console. As you cannot upload an ISO image yourself, you have to contact the Hetzner support to do that for you. Once done, it should look like this:

Click on “Mount” or “Einbinden” and then simply shut the server down by clicking the ON/OFF switch in the top right corner. Then, turn it on again and connect to the console by clicking on the console icon next to the ON/OFF switch. Now you should see the DragonFly live CD booting with it’s beautiful dragonfly ASCII logo:
Don’t worry if the boot hangs once for a few seconds showing
**WARNING** waiting for the following device to finish configuring:
  usb: func=0xfff
After a couple of seconds it will continue to boot.
Once fully booted up, login as root (no password). Type ifconfig where you
should see the VirtIO network device vtnet0. Usually, I would now proceed
with testing the network by typing dhclient vtnet0. But we found out that
dhclient does not work properly in this scenario as there is some kind of a
strange routing problem. For more information see my DragonFly bug report
Network vtnet0 not working on Hetzner cloud (#3317). Good news
is that we have a new DHCP client that you can start with service dhcpcd onestart. If you had accidentially typed dhclient vtnet0 before, it’s now
time to reboot before trying to start dhcpcd.
You can now continue with the normal installation. Just exit and login as
installer. When it asks you about “UEFI or legacy BIOS?” choose “Legacy
BIOS”, as when choosing UEFI it would not find your harddisk.
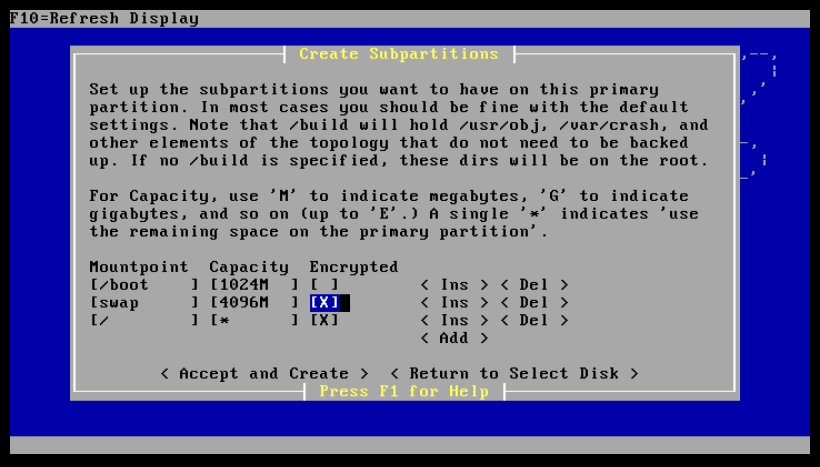
When it comes to creating the subpartitions, I am using encryption for swap and
the root partition, but not for /boot. Keep in mind that with encryption
enabled, your system won’t boot up anymore unattended. Another thing that I
change in this dialog is to decrease the size of the swap partition from 8 GB
to just 4 GB, that’s still 10% of the SSD and probably wasted space. I probably
could just disable swap altogether.
Once “DragonFly BSD is Installed!”, skip the “Configure this System” step, as it will likely enable DHCP in the wrong way (maybe not), click on “Reboot”, then eject the ISO image from the Hetzner Cloud Console and boot into the freshly installed DragonFly system from the SSD.
Post-install Configuration
Once booted into the newly installed system, before making any changes, I create a snapshot:
hammer2 snapshot / INSTALL-6.2.1
This allows me to later on see all the changes being made and to do incremental
backups against the installed version. You can mount a snapshot with mount @LABEL /mnt where @ABEL would in this case be INSTALL-6.2.1.
To get a network connection, add the following line to /etc/rc.conf:
dhcpcd_enable="YES"
Upon reboot you get your IP address assigned via DHCP. For now, just type
service dhcpcd start and try to ping a public host. Note that rcenable
seems to have a bug, otherwise you could simply enable and start the service by
running rcenable dhcpcd.
One you have network connection, you can setup ssh and install packages. I am not showing
this here.
Summary
Here are the most important steps again:
Choose a server from the Intel-line (CX11, CX21, CX31, CX41 or CX51). The AMD servers don’t work as DragonFly does not support the newer version of VirtIO.
Ask the Hetzner staff to upload the DragonFly live ISO image. You can then mount it and boot from it.
In the DragonFly BSD installer, choose “Legacy BIOS” instead of “UEFI”.
Use
dhcpcd_enable="YES"and notifconfig_vtnet0="DHCP". The newerdhcpcdclient works flawlessly while the olderdhclientsomehow corrupts the routing table.
That’s it! Enjoy DragonFly on the Hetzner cloud!